• 車種別
  • パーツ
  • 整備手帳
  • ブログ
  • みんカラ+

REsuper7のブログ一覧

2014年04月29日 イイね!

RE雨宮 Transformation Part 1

Hooray! My RE雨宮 parts finally arrived after 3.5 months of waiting!! Considering how momentous the occasion was, i prepared my camera when the delivery truck arrived and snapped some pics of the boxes being unloaded...i know it's a little ridiculous, but hey, cut me some slack, i waited a whole 3.5 months for these parts!

Here's the delivery truck backing onto my driveway with my precious parts inside


On the boxes are labels that state, "do not rest boxes on its side", and of course, here they are, not just laid down on their side, but on top of each other!


I immediately opened each box and checked for damage before signing off on the packages. The parts were wrapped extremely well with bubble wrap, so there wasn't any damage. Here are the four massive boxes holding all of my awesome parts


I inspected each part to make sure i got everything i ordered and also to ensure there was no damage.


And here's Isaac posing with the GT wing, the one piece he's been asking me to install since i got the car!


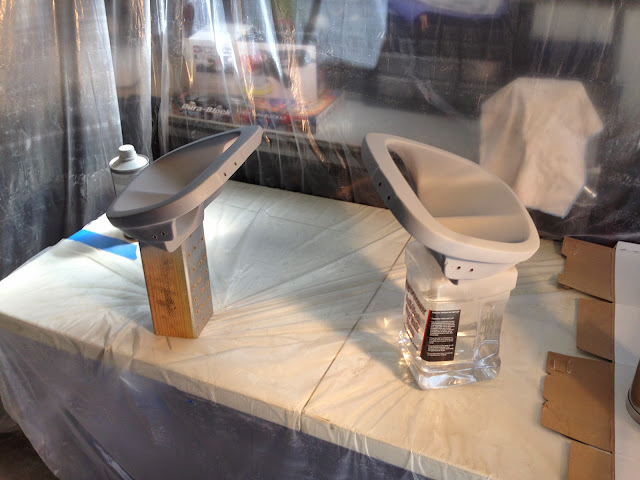
Unfortunately, the joyous day was slightly marred when i realized they delivered the wrong canard. I ordered the canard that was specifically meant to be used with the N1 undersweep, but the one they delivered was a just a generic canard that didn't have the side piece that attached to the undersweep. Bulletproof Automotive, the company that helped me import all the parts, was gracious enough to expedite an exchange, so i'll be shipping the canard back to RE tomorrow. I should get the replacement part back before i'm done installing the kit, so i should be good.

Since i had removed all the existing parts earlier, i was able to start fitting the parts onto the car the same day. The front fenders bolted onto the car easily, then i started fitting the front bumper, which required some cutting to fit properly because the bottom of the radiator extended too far out. It's unfortunate, the main reason i converted to a vmount setup was so that i wouldn't have to cut the RE雨宮 bumper when i finally came around to installing it. Luckily, i didn't need to cut away too much material, but the fact is, i'll have to cut away parts of the carbon undersweep as well which is sad. Oh well...it's sort of too late to swap out my vmount for another design where the radiator didn't extend out as far.

Here you can see the little notch i had to cut to accommodate the radiator.


After the front bumper was settled, i moved onto the passenger-side side-skirts and rear fender. The parts lined up really nicely right out of the box, but to make it perfect, i would need to do a little bit of cutting.


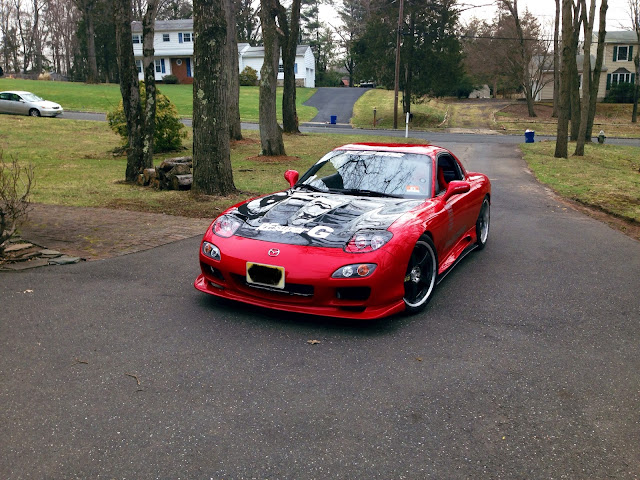
Here's another shot of the front. The parts really do fit awesome with minimal modifications. Another reason why you should always buy authentic products from the original designer/maker.


Probably the most dreaded part of the whole process was cutting the rear fender. The whole point of the widebody kit is to extend the fenders outward allowing you to run larger wheels and tires. Since the rear was only an over fender, to really make use of the added width, you need to either roll the fenders significantly, or cut away the fender. I didn't have a fender roller, which meant it had to cut the fender. In the end, cutting the fender is really the only way to maximize the amount of space gained with the over fender, so i think i made the right choice. As much as i prepared myself for this moment, cutting the fender off was kind of heart-wrenching, but i knew that this was the only way to properly complete my build so i had to continue. I had to keep reminding myself of my commitment to the build. In the end, the cut came out relatively clean and i managed to hammer the inner fender up to meet the new edge of the outer fender.

Here you can see where i cut the outer fender


After removing the outer fender, i cut slits into the inner fender and hammered the inner fender up to close the gap between the two.


Once the two edges met again, i cut off the flaps. Now i just need to use some JB weld to weld the two lips together, then use some body filler to fill in the holes and prevent rust.


Luckily, once the over fender was on, you couldn't tell how much "damage" was done to the fender and it looked like new again. With the fender cut, i could now mount my new wheels onto the car to get my first preview of what the car will look like when it's finally finished.


I was surprised by how much room i had at the rear with the new fenders, so i took the one inch spacer i had in the front and moved it to the rear.

Here's the rear wheel without the spacer.


And here's the rear wheel with the spacer.


Here's another angle of the rear wheel with the spacer.


As for the front, i have no idea how anyone could fit a 295/35 tire there because even with a 265/35 tire on a 18x10.5 inch rim, i have barely enough clearance. Granted, the car isn't level and i still need to dial in some negative camber, but still, i can't picture fitting a 295/35 at the front. Oh well, i still have time to play around with the setup in the future when i actually decide to go wider.

Here's the front wheel. You can see how much it sticks out.


And here's one last pic of the passenger side of the car resting on some ramps.


It looks like i still have plenty of room to lower the car more, but i'll work on those adjustments after i've got the kit fully mounted to my liking. I'm halfway done with the driver side as well, but i still need to cut the driver's side fender and also figure out how to mount the gas cap. Once that's done, i should be able to set the car done and really figure out what kind of alignment changes i need to make as far as camber goes. Considering it's only been 5 days since i got the parts, i think i've made pretty good progress so far, not that i'm in a rush or anything. Actually, i plan to really take my time with this kit and make sure it fits exactly how i want it, so there are no regrets after i get around to painting, because i don't don't want to fool around with fitment after i paint the parts. I'll start another post after i make some more progress.

Posted at 2014/04/29 09:14:15 | コメント(0) | トラックバック(0) | Modifications | 日記
2014年04月24日 イイね!

ドライブの春

Now that winter is finally over, i organized a spring drive with some friends. Since my body kit is due in soon, this will be the last drive that i do in its current guise. We got an early start to the day by meeting up at 7am at a nearby gas station.


The cars that came on the drive included a BRZ, 2 RX-7s, a G37s, and a BMW 328i. We decided to head out early since traffic is much lighter in the early hours and a lot of the roads we would be hitting were single lane roads, so we didn't want to get stuck behind slower cars. The plan was to take some backroads through the Delaware Water Gap and head up towards High Point State Park since the season hasn't started yet so the park was free, otherwise we would've had to pay $5 per car to get in. Halfway through the Delaware Water Gap i got a message from my brother-in-law about stopping for a bathroom break, unfortunately, there wouldn't be any bathroom for miles, so instead we did what any sensible man would do; pull over onto the side of the road. We took that opportunity to snap a few pics before heading out again.


The last time my car will look like this


The only other RX-7 in our group


My brother-in-law's BRZ


And the G37s


From there, we headed up to High Point and took in the scenery while snapping more pics.

You can actually see clouds below us in the distance in this picture


And here's a random picture of Isaac jumping off the rock. For some reason i really like this action shot of him...makes him look like a ninja:


My brother-in-law tried to do a couple of donuts and drifts but other people started showing up so we had to leave. From there we headed back down the "mountain" and decided it was time for lunch. Unfortunately, the place that i originally wanted to take the guys to, Chatterbox Drive-in, didn't open for another 30 minutes, so we decided to just head towards home and find some fast food place for lunch. At least we got in a couple of nice group shots.


We eventually found a McDonalds on our way home so we stopped for a quick meal before dispersing and heading home.


Although that was the first drive of the year, it was also the last one for a while, because when i got home, i put the car on stands and started disassembling her for the big overhaul. I removed the front bumper, front fenders, rear bumper, and trunk plastics so that once my parts arrive, i can begin test fitting them right away.


And lastly, i picked up some alcantara shift/ebrake boots off a rx7club forum member just because the price was good and i wanted a change. I also swapped out my RE雨宮 D1 Quick Shifter in favor of the shifter that came with the car which i believe is a Mazdaspeed one. The Mazdaspeed one definitely feels a little bit better because the RE雨宮 one felt mushy compared to the Mazdaspeed one which is more clunky, for lack of a better term. It just feels more satisfying to shift with the Mazdaspeed one for some reason. Probably just personal preference. Anyway, here's my new set up...for now:


That's it for now...the next time i post it should be about my new body kit!! Can't wait!!
Posted at 2014/04/24 09:21:49 | コメント(0) | トラックバック(0) | Drives | 日記
2014年04月08日 イイね!

塗り物

Since i was in 高等学校 i have always wanted to learn how to paint cars and car parts. I think mainly because that was when i had my 1995 Honda Civic Si that was black and i wished i could paint it a different color, like red. I was also into body kits at the time, and i wished i could just paint the parts myself rather than take the car to a body shop to have them paint the parts for me. Unfortunately, i never got around to learning for many reasons including cost, location, knowledge, etc. However, since i got my new FD, i've been going back and forth between having a body shop paint and install everything, or finally learn how to do it myself. My thought process went from finding a body shop to paint and install everything, to my doing the install myself and just having the body shop paint the parts for me, to just painting and installing everything myself. I think the turning point was back in February, when i remove my headlight housings so that i could find a body shop to repaint them and repair some holes for me. I figured i would use my headlight housings as a test run to find a good shop that i could ultimately have paint my body kit when it arrived. Here are what the housings looked like when i first removed them. Notice the right housing has holes in it that i was looking to patch.


Here's アイザックくん and ナオミちゃん helping me with the disassembly of the headlights


They actually did a very good job taking out all of the bolts for the brackets


So one day, i made some calls and brought the pieces to 3 body shops for a quote. The first shop wanted $500 to repaint just the housings!! So i quickly left there and went to a second place, and they quoted me $250, which was far more reasonable. Then lastly, i went to a third shop just for comparison purposes, and they quoted me $200, and they happened to be the closest one to my house so the next day i dropped off the housings along with the paint code. At the time, the quote i was given was under the assumption that it was a 2-stage paint, meaning just base coat and clear coat. It was only later on that i found out the OEM Vintage Red color was actually a 3-stage paint due to a top coat required between the base and the clear coat, which i know would've easily bumped the cost of the job above the quoted $200. But anyway, about a week after i dropped off the parts, i called the body shop to see how things were going and to find out when i can expect to pick up the finished parts. Shockingly, the owner of the shop told me he hasn't even touched the parts yet and he doesn't think he will be able to get to it for another 2 weeks! (´⊙ω⊙`)!That's when i started thinking, if it's gonna take this guy 3-4 weeks to paint two small headlight housings, how long is it going to take him to paint a full body kit, 6 months?!?! So i told the owner that i was just going to pick up the unfinished parts and find another place to work on them, but in reality, i was thinking that it was finally time for me to learn how to paint. The last thing i wanted was to wait an additional 3-4 months to get my body kit on after having (or continuing to have to) wait 3+ months just to receive it. Plus, i knew that i could live with my own mistakes knowing that i can learn and try again to make it better, but i couldn't live with other people's shoddy work that i paid good money for and waited months to complete. So for the next month i started doing research and buying parts and supplies to paint myself. Luckily, the weather was still freezing, so it's not like i could paint right away anyways.

As they say, when it comes to painting, the key to a good paint job is all the prep work leading up to the paint. So the first step was to sand down the housings and fill the holes that i wanted to get rid of.


After about 2-3 days of repairing and sanding (i work slow), it was finally time to prime the parts. I took about a day to prep the garage and get all of my spraying equipment sorted. Since it was my first time painting, i had to familiarize myself with how the spray gun and the turbine HVLP system worked. The first coat of primer went on pretty easy. It was nice to finally see the parts in a uniform color even if it was just a primer grey.


I ended up doing a second coat of primer because i sanded through the first coat on some parts. Next up was the base coat, then the top coat to color match. Here's the base coat layer before the top coat.


Honestly, i didn't know what the heck i was doing. I just sprayed the top coat on top of the base and hoped the color matched the existing paint. Luckily, i think the color came out pretty close, so i was happy.


In the end, i wasn't ecstatic about the results, but for the headlight housings, i think it was good enough. I didn't even bother sanding the clear because behind the lens cover, you couldn't really tell anyway. Here's a comparison showing the difference in color before and after:

ビフォー


アフター


As you can see, the red from ビフォー doesn't actually match the color of the car. It also helps that i bought new lenses for the headlights so they look much newer in the アフター picture.

My experiment with the housings is a little inconclusive due to the fact that the shape was so three-dimensional as opposed to a flat surface, so the technique required is very different than it would be for painting a bumper. I think with a little more practice, i should be able to do a good enough job with the body kit that i can install it without feeling too badly. And here are some shots of the headlights back in place:


I also finally got around to installing some of my RE雨宮エンジンドレスアップ parts like my radiator caps and my oil filler cap


Only 2 more weeks to go before my body kit arrives!!!!!!!
Posted at 2014/04/08 09:20:24 | コメント(0) | トラックバック(0) | Modifications | 日記

プロフィール

「Final Form invades New Jersey - Part 1 http://cvw.jp/b/1870903/40833510/
何シテル?   12/11 07:27
はやしです「Andy」. よろしくお願いします。 I'm a Taiwanese American living in NYC who loves Maz...
みんカラ新規会員登録

ユーザー内検索

<< 2014/4 >>

  12345
67 89101112
13141516171819
20212223 242526
2728 2930   

愛車一覧

マツダ RX-7 REsuper7 v2 (マツダ RX-7)
This is my replacement car that will be rebu ...
BMW 3シリーズ セダン Diesel (BMW 3シリーズ セダン)
This is a 2011 BMW 335D that my dad gave to ...
メルセデス・ベンツ Cクラス セダン BenZ (メルセデス・ベンツ Cクラス セダン)
This is the car we bought from my mother-in- ...
ドゥカティ 848EVO DesmoLin (ドゥカティ 848EVO)
This is my Ducati 848 that i ride mostly at ...

過去のブログ

2017年
01月02月03月04月05月06月
07月08月09月10月11月12月
2016年
01月02月03月04月05月06月
07月08月09月10月11月12月
2015年
01月02月03月04月05月06月
07月08月09月10月11月12月
2014年
01月02月03月04月05月06月
07月08月09月10月11月12月
2013年
01月02月03月04月05月06月
07月08月09月10月11月12月
ヘルプ利用規約サイトマップ
© LY Corporation