Sorry for the lack of updates lately! Partially it's because i started a new job on 10/5, but also because i've been cramming as many car related events as i could into the past three weeks. On the plus side, i have lots of new photos to share, so let's get started!
The weekend after i "finished" my car, i got in touch with my good friend Ted who owns the yellow RE FD. Originally we were planning a short drive to Round Valley to help break in my car and build up my confidence in the car to make sure everything was ok, but at the last minute, we decided to crash a Nissan meet 35 minutes away from my house. Ted had some friends at the show already who promised to save us some spots so we headed over. Naomi wanted to join us so we took her along for the first drive out of our town. Needless to say, i was super nervous the whole time. Ted asked me to lead since he knew i would drive real slow. Luckily we made it to the meet without any issues!
When we arrived, amidst a sea of Nissans was a lone white FD waiting for us to join him.
The meet had already been underway for a while, so we didn't waste any time and started checking out some of the cars right away. There were a nice selection of cars on hand and this row of S14s were some of my favorite:
After walking a little further down, we came across this deadly looking R35. This is not a car i would want to bump into on the free way that's for sure!
I was also happy to see some classics on hand as well, including this classic Z
and this not quite classic yet, R33
We were expecting another friend to arrive, Darren, the one with the itasha S14 drift car, but even after making our rounds, was no where to be seen. Until, we look down the street and lo and behold there's a bunch of guys rolling the carpet queen down the road like he was some kind of royalty
Turns out his fuel pump was acting up so he didn't want to start the car, although, later on he did figure it out and was able to fire the car back up. As a side note, i gotta say, Darren is one of the nicest people i have ever met since Ted introduced me to all the local car people. Even though i've only hung out with him a couple of times and hadn't seen him in months, he treats you like you're his best friend. Definitely a great guy to be around.
Along with Darren was this purple Supra that looked like it meant business. Another car i wouldn't want to bump into on the freeway.
I didn't stay too long and had to leave first because it was the day before i started my new job and wanted to make sure i got some rest before my first day. Although it was short, it was nice to see some old friends and meet some new ones as well. It's good to be back.
Here's a shot that a local photographer took that came out pretty cool. That's me sitting on the curb and that's Ted sitting on the ground with Naomi behind my car.
And of course, i had to take one of my little princess to commemorate our first real drive in the revived REsuper7
Originally i was just going to do one post to cover all the events i've done since i finished the car, but after i started collecting pictures i realized it would be foolish to even try. Instead, i will split them up and dedicate one post to each, so stay tuned for more updates!
It's hard to believe that exactly 11 months after i wrote my most difficult post, i can now make this post to announce that REsuper7 has officially been REborn!!!! ☆ミヾ(∇≦((ヾ(≧∇≦)〃))≧∇)ノ彡☆
But before i unveil the fruit of my labor, i'd like to finish going through the final stage of the build process. Although i've been harping on and on about how i rushed through this build in order to get it done by the end of September, that doesn't mean that i didn't try to improve the car over the previous build. In fact, there are a few things that really bothered me with my last build that i've corrected this time around. One of those things was the gas cap. As good of a job i did last time with making sure the gas cap lined up perfectly with the fender flare, i couldn't get the door to open all the way, and it rubbed the fender pretty hard if you tried to push it open further. This bothered me especially because i was worried it would damage the paint (dip), so this time around i made it a point to figure out a way to get the door to open all the way without rubbing the fender.
Although you can't tell in the picture, i actually had to drill new holes to push the left side of the door where the hinge is out even further to give it the extra room it needs to swing open all the way without rubbing. Although RE雨宮 provides a bracket to bump out the hinge, no amount of adjusting will allow it to open without rubbing (trust me, i've tried every possible angle). With the new holes drilled, it now opens all the way! Woohoo!!
And magically, with some adjustments, it still closes flush. Here's a video showing the fuel door. If you can't already tell, i'm pretty proud of this feat.
With the door jambs and fuel door done, it was time to move on to paint. First, i decided to paint most of my carbon parts with anthracite grey plastidip. I did it for two reasons, 1. a lot of the carbon parts i'm reusing from the crash were scratched up. Since i didn't want to spend too much time refinishing the carbon parts, i decided to just dip them for now to cover up the scratches. When i have more time, i'll see if i can repair the cracks. 2. I wanted to protect my non-damaged carbon parts from rocks and other road hazards. Doesn't hurt to try and be consistent with the colors either.
With all the carbon bits painted, it was time to prep the car for paint. After seeing so many RE雨宮 FDs in Japan with painted AD9 hoods, i decided to give it a shot as well, but with a slight variation. I figured why not show a little bit of the carbon weave underneath, so i taped off the vents so they would remain carbon after the hood was painted. I also took the liberty of installing my Aerocatch hood pins, Ready Go Next CTA3 air ducts, and the RE雨宮 AD9 hood carbon add-ons.
Here you can see the cutout i made for the RGN CTA3 air ducts. I didn't cut the hole as big as the air duct itself because i didn't want to cut into the skeleton of the hood. Despite that, i still think the added vent will improve underhood cooling. And here's the hood taped off ready for paint.
And here's the rest of the car ready for it's final transformation.
The new dip spray that i got was supposed to be a new formula that had better coverage than the previous one and didn't require a base coat, but after having used it, i feel like i got better coverage with the grey basecoat that i sprayed the first time around. This white still came out pretty thin. I ended up using all three white gallons that i had just on the car and didn't even have enough to spray the headlight buckets and the wing. As a result, i had to order another white gallon just to paint the wing...
And it's a good thing i did too, because for some reason i had to use about 2/3 of the white gallon just to paint the wing!! I don't quite understand why it took that much dip, but it did, so i'm grateful i had the extra gallon. Here you can see one of the main benefits of dip. Since it's peelable, i didn't need to tape off the wing mounts to paint, i just had to peel the paint off the mounts after i was done.
I had originally thought that once the paint was done, putting everything else back together would be a piece of cake...boy was i wrong. I spent a good two days and countless hours just getting everything back onto the car. With every little thing i did i felt like i was fighting fires because the dip was peeling from rubbing against parts as i installed them. The worst were the two doors. Despite working perfectly before paint, once they were painted, they started rubbing and peeling some of the paint away. I didn't take that many pictures during this last stage as i was just focused on getting it done ASAP. I did want to share a close up of the wing stand and the new carbon cover i made though. It actually came out better than i expected.
And without further ado, i present to you Phoenix 7 aka REsuper7 REborn!!
Before i could take it out for it's maiden voyage i had to do a couple of things, 1. clean the windows, and 2. make a bracket for the front license plate (I got tired of being scared of getting pulled over for putting the license plate in the windshield).
The windows were filthy having not been cleaned in the years before i took ownership, plus all the dust and overspray from the work i did in my garage. Here's a quick look at what i was dealing with.
To tackle this problem i bought a Griot's Garage random orbital polisher and some Driven Extreme window cleaner. I gotta say, i am quite pleased with how it came out. I didn't think it would be possible to clean all the gunk off the windows, but it worked as advertised!
Since before the crash i've been procrastinating making a front license plate bracket. I even got pulled over once last year specifically for having my license plate in my windshield. Luckily the cop let me go because it was just down the street from my house. Not wanting to deal with that again, I went ahead a made bracket. While i was at it, i created a steel bracket for the Takata x Speedhunters tow strap that i've had for almost 2 years now but never installed. Although i hope to never use it, i think it should hold if i ever do.
The only reason this set up is possible right now is because i don't have dual oil coolers. If i ever go that route, i'll need to rethink my setup. Oh well, i'll cross that bridge when i get there.
For it's maiden voyage, i took a trip down the street to fill up the gas tank. Perfect opportunity to snap the obligatory gas station pics.
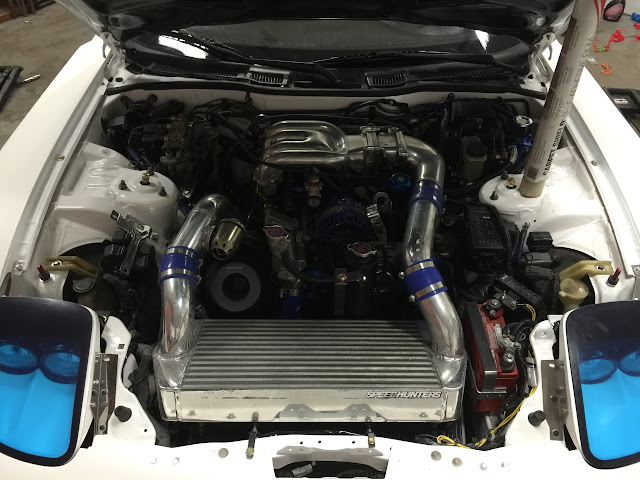
And here's a quick shot of the interior and the engine bay.
I LOVE the fact that when i pop the hood and open the doors i no longer see RED, but just nice plain white...what a relief. Unfortunately, the same can't be said for the trunk, but at least i open the trunk regularly so it's something i can live with for now.
So after 11 months (technically only 9 months of build time since the first 2 months were for mourning), REsuper7 is finally back. It's still kind of surreal to open the garage and see my car put together again. I thought i'd never see the day i actually got my car back, but now it's here, and i can't be any more happy with it than i am, despite all its flaws. The only thing left to do now is slap some stickers on and enjoy! ☆*:.。. o(≧▽≦)o .。.:*☆
 Making Up Lost Time