• 車種別
  • パーツ
  • 整備手帳
  • ブログ
  • みんカラ+

freedomgliのブログ一覧

2015年05月28日 イイね!

Miata Chassis Stripped to Just the Bare Essentials

Miata Chassis Stripped to Just the Bare Essentialstchach11 20150405_164907_resized_zpsdujxrnnq

Most enthusiasts know the age old adage, "Simplify, then add lightness." If you can't afford an Exomotive Exocet doesn't mean you can't build your own lightweight Miata pared down to the bare essentials. These cars represent the poor man's Arial Atom.

bodyoff

IMG_0638

lightweightMiata_zps966317d2

20130223_160132

10690544716_d3c8463ac4_c

3573b83a3f32c20eba3eb88b350c4eea

26e557aaf6af61ec72da8c504a251428

CB-Catfish.5
Posted at 2015/05/28 01:09:09 | コメント(0) | トラックバック(0) | 日記
2015年05月27日 イイね!

Kazespec Engineering

Kazespec EngineeringScreenshot_2014-12-26-16-10-19_zps5191b80f

Check out the extreme aero on this Kazespec Engineering demo car. The aluminum rear diffuser is integrated with the large rear wing and custom upright wing mounts. Kazespec Engineering supports the grassroots racing community and the people involved by making functional parts and custom parts including racing bucket seat mounts, oil pan baffles, custom wing uprights and more.

11203108_839086912837308_7857798509684626642_n

Screenshot_2015-04-24-20-46-46_zpsfvfjgrxb

Screenshot_2014-12-26-15-33-39_zps17ab2d20

Screenshot_2014-12-26-16-09-48_zps2dbb2b79

KazespecLotusLogoorange

oil-pan-baffle-small

full-oil-pan-baffle-installed
Posted at 2015/05/27 01:21:58 | コメント(0) | トラックバック(0) | 日記
2015年05月02日 イイね!

Honda JV6 engine swap

Honda JV6 engine swapIMG_7754s

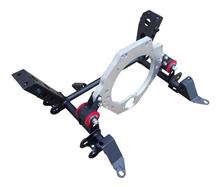
Mini Tec, creator of some very cool and very fast Honda VTEC equipped BMC Minis, has ventured into the Miata market with their new brand called SuperFastMiatas. They offer a very cool kit to faciliate swapping a Honda J-series V6 engine into any 1990-2005 Mazda Miata. This is a great way to get reliable 280hp performance.

They currently offer two kits: basic and comprehensive.

The basic kit costs $2,850 and consists of the follwing:
*Front subframe to adapt Honda J engine into Miata (retains Miata front anti-sway bar)
*Transmission adaptor plate from Honda J engine to Miata transmission
*Custom oil pan
*Polyurethane engine mounts
*Flywheel adaptor
*Oil pickup and thermostat housing

JV6 KITSS

The comprehensive kit costs $650 more but adds:
*Starter motor
*Exhuast manifold and downpipe
*Clutch kit with flywheel

You'll need to supply your own motor from a J32A2 01-03 Acura CL Type S or
J35A4 02-04 Honda Odyssey. Other J-series engines may work but have not yet been 100% verified. You'll also need the OEM engine wiring harness that goes with the motor, standalone engine management system and some intake modifications if you don't want to cut a big hole in your hood for clearance.

SuperFastMiatas has built two demo cars (NA and NB)

IMG_7291

IMG_7297

IMG_7285

IMG_7279

IMG_7277

IMG_0201

IMG_0199

IMG_8154

IMG_8155

And the first customer cars are nearing completion also
11133706_864510623586271_3522769482771621425_n

10653576_864510600252940_6116038877940147251_n

1911693_864510523586281_6884069219230314894_n

Untitled

Untitled


To give you a greater idea of who Mini Tec are, check out this wicked AWD Honda B18 powered Mini built by them.
100_3342

100_3339

100_3349

100_3358

100_3334

100_3350

100_3289

AWD Mini!

100_3353

100_3345
Posted at 2015/05/02 02:13:47 | コメント(0) | トラックバック(0) | 日記
2015年04月30日 イイね!

NB1 motor swap progress

NB1 motor swap progressOld motor is out

Now that winter's icy cold grip has finally relented, I was able to get some more work done on the Miata this weekend.

Empty engine bay
Empty engine bay. Note all the tags to identify various hoses and plugs and what not. Rubber caps keep fluids in and foreign objects out.

Detailing engine bay

Old 1.6 engine and transmission
Old 1.6 engine and transmission are out.

PS delete and AC brackets swapped over to new motor
PS delete and AC compressor brackets swapped over to new motor

1.6 oil pressure sender unit swapped over to new motor
1.6 oil pressure sender unit swapped over to new motor. 1.6 cars have true oil pressure senders, but all 1.8s - aside from 94s - have idiot lights turned into gauges. Hence, you’ll want to install your original oil pressure sender in place of the 1.8’s oil pressure sender. Your original sender is pretty big, whereas the sender on the new (post-94) engine is pretty small, but they both use the same spade connector and thread into the same place in the same manner.

I also deleted the NB knock sensor (blind hole right above the oil pressure sender) because whatever sticky black goo the microphone was potted in was leaking all over the place. Maybe one day I'll buy a new knock sensor and figure out how to configure the Megasquirt to use it. Basically, you have to tune the filters to detect knock (vs. normal combustion events) and then create a map to pull ignition timing when it detects knock.

Flyin' Miata ignition coil relocation bracket
Flyin' Miata ignition coil relocation bracket and M-tuned coolant reroute fitting installed. I used an OEM gasket instead of the M-tuned supplied sticky foam gaskets since I had plenty of access and could ensure the surface was immaculately clean of all old gasket material. I imagine doing this install while the motor is in the car would be quite a challenge and the sticky back gaskets would be useful in that case. Time will tell if I made the right gasket choice. Here's hoping for a lifetime free of coolant leaks!

M-tuned coolant reroute fitting on back of head
Side view of the M-tuned coolant reroute fitting on back of head. I also installed new temp sensors. The small sensor is for the instrument panel temperature gauge and came with its own thread sealing paste applied from the factory. The large green sensor is for the ECU. I wrapped the threads in Teflon tape to seal them from leaks. The Megasquirt EMS will also use the green sensor to monitor coolant temps for radiator cooling fan control instead of the thermistor that 1.6 cars originally had on top of the front thermostat housing that's since been removed.

Longer screw for Flyin' Miata coil bracket
Longer screw for Flyin' Miata coil bracket wire harness clip. The screw supplied by Flyin' Miata was too short to engage the nylock feature of the supplied nut. I used a longer screw that would fully engage the nylock so it won't vibrate loose.

Original 1.6 ignition coil signal wire configuration
Original 1.6 ignition coil signal wire configuration.

New 1.8 ignition coil signal wire configuration
New 1.8 ignition coil signal wire configuration. When doing this swap you must reuse your 1.6 coils, as the 1.8 coils aren’t compatible with the 1.6 electronics. The easiest method is to simply bolt your 1.6 coils into the Flyin' Miata ignition coil bracket, which will allow you to bolt them to the 1.8 valve cover. Most plug wires won’t fit with the coils in their original orientation, though - from left to right, the 1.6 plug wire order is 2-3-4-1 and the 1.8 order is 1-4-2-3 (1 being the front spark plug). By swapping the signal wire between the two coils, you’ll match your 1.6 coils to the 1.8 plug wire order and your plug wires will work (all 90 - 00 plug wires are the same). There are two wires (underneath a plastic cover) on the bottom of each coil. The power wire is red, and you can easily tell that the wire goes to both coils. The other wire is the signal wire. Swap those signal wires and use the correct (1.8) plug wire order.

1.6 plug wire order
1.6 plug wire order. Looks like #1 and #4 were actually switched at some point, but it doesn't really matter much since the ignition system is batch fire wasted spark. I actually prefer this routing as it looks cleaner and more organized and I don't like it when plug wires criss cross-each other as that increases radio frequency interference and the chances of arcing between leads.

1.8 plug wire
1.8 plug wire order.

Servicing the new transmission on the workbench
Servicing the new transmission on the workbench. The goal was to swap the Toda Racing flywheel and nearly new clutch from the old motor to the new one and give the new transmission some new seals front and rear.

Transmission front cover with new oil seal installed
Transmission front cover with new oil seal installed. Note correct seal orientation. When fitting the new paper gasket it helps to smear a thin film of oil on it so it sticks to the transmission gasket sealing surface while you reinstall the front cover. Don't forget the little oil shim (not pictured here). I also grease the front cover snout so the throwout bearing slides smoothly and the clutch fork pivot and the transmission input shaft splines. FYI the NA clutch fork boot is not the same size as the NB clutch fork boot.

1.8 (NB1) engine mount bracket on left vs. 1.6 (NA6) on right
FYI for comparison purposes. The 1.8 (NB1) engine mount bracket on left vs. 1.6 (NA6) on right.

Garage Star alternator pulley installed
Garage Star alternator pulley installed. The alternator/water pump belt must be tensioned properly and you'll need an impact driver to remove and install the nut that affixes the alternator pulley.

New 1.8 motor and trans ready to go back in
New 1.8 motor and trans ready to go back in.
Posted at 2015/04/30 00:21:44 | コメント(0) | トラックバック(0) | 日記
2014年11月27日 イイね!

Another Pit Crew Resurrection

Another Pit Crew Resurrection1

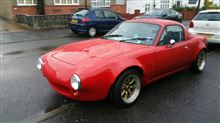
I hope MadaboutMX5 James doesn't get mad at me for sharing this with our Minkara friends before he does. This beautiful red classic NA Roadster is owned by James' mate in the UK. It was reportedly a non-running piece of junk when he bought it but in short time they've got it running and looking great!

It features the full Pit Crew Racing body kit. The fenders have been widened with CarbonMiata fender flares. With a tune up and all the rust taken care of and a fresh coat of paint, all that's left is some new suspension to lower the ride height and some interior pieces to make the cabin as special as the outside.

2

3
Posted at 2014/11/27 03:24:46 | コメント(1) | トラックバック(0) | 日記

プロフィール

「McLaren P1 Style LED Tail Lamps http://cvw.jp/b/235280/39398683/
何シテル?   03/03 03:02
I am pleased to share my automobile and motorcycle passion with you.
みんカラ新規会員登録

ユーザー内検索

<< 2025/6 >>

1234567
891011121314
15161718192021
22232425262728
2930     

愛車一覧

アルファロメオ ジュリア アルファロメオ ジュリア
La meccanica delle emozioni
アプリリア RS125 アプリリア RS125
My chainsaw with wheels. Classic 2-stroke G ...
アプリリア RS50 アプリリア RS50
My new toy. 13 years old and only 500 miles ...
ホンダ CB350 ホンダ CB350
This bike began life as a standard machine. ...

過去のブログ

2017年
01月02月03月04月05月06月
07月08月09月10月11月12月
2016年
01月02月03月04月05月06月
07月08月09月10月11月12月
2015年
01月02月03月04月05月06月
07月08月09月10月11月12月
2014年
01月02月03月04月05月06月
07月08月09月10月11月12月
2013年
01月02月03月04月05月06月
07月08月09月10月11月12月
2012年
01月02月03月04月05月06月
07月08月09月10月11月12月
2011年
01月02月03月04月05月06月
07月08月09月10月11月12月
2010年
01月02月03月04月05月06月
07月08月09月10月11月12月
ヘルプ利用規約サイトマップ
© LY Corporation