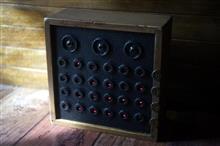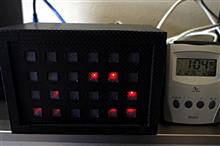
先日作成しました二進数時計ですが、実は1日で1分くらい遅れる時計でした。
それでRTCモジュールDS1302と言う水晶(クォーツ)を使った基板を付けたしました。

それでも1日に数秒、ずれてしまいますけどね・・・
これをArduinoで使うにはDS1302のライブラリが必要です。
この辺がよくわからず苦労しましたが・・・
汚いソースコードですが・・・Arduino IDEでのプログラムです。(配線図が無いと意味ないけど)
//二進数時計
#include <DS1302RTC.h>
#include <Time.h>
#include <TimeLib.h>
// Init the DS1302
// Set pins: CE, IO,CLK
// Set pins: RST,DAT,CLK
DS1302RTC RTC(14, 15, 16);
time_t tokei;
const int buttonPinH = 19; //時を進めるボタン
const int buttonPinM = 18; //分を進めるボタン
const int buttonPinS = 17; //秒をリセットするボタン
int buttonState = 0;
//LEDの表示状態
int tb46[4][6] = {{HIGH, HIGH, HIGH, HIGH, HIGH, HIGH}, {HIGH, HIGH, HIGH, HIGH, HIGH, HIGH}, {HIGH, HIGH, HIGH, HIGH, HIGH, HIGH}, {HIGH, HIGH, HIGH, HIGH, HIGH, HIGH}};
//列のピン番号
int tb01[4] = {
11, 10, 9, 8
};
//行のピン番号
int tb02[6] = {
2, 3, 4, 5, 6, 7
};
void setup()
{
//ボタンを入力に設定
pinMode(buttonPinH, INPUT_PULLUP);
pinMode(buttonPinM, INPUT_PULLUP);
pinMode(buttonPinS, INPUT_PULLUP);
//LEDピンを出力に設定
for (int i = 0; i <= 3; i++)
{
pinMode(tb01[i], OUTPUT);
}
for (int i = 0; i <= 5; i++)
{
pinMode(tb02[i], OUTPUT);
}
// setTime(16,30,0,2,17,2018);
Serial.begin(9600);
if (RTC.haltRTC())
Serial.print("Clock stopped!");
else
Serial.print("Clock working.");
if (RTC.writeEN())
Serial.print("Write allowed.");
else
Serial.print("Write protected.");
setSyncProvider(RTC.get);
if (timeStatus() == timeSet)
Serial.print(" Ok!");
else
Serial.print(" FAIL!");
RTC.set(now());
}
void loop()
{
while ( tokei == now() ) {
dispTokei(); //LED表示
}
buttonState = digitalRead(buttonPinH); //時ボタン
if (buttonState == LOW) {
setTime(hour() + 1, minute() , second(), day(), month(), year());
RTC.set(now());
}
buttonState = digitalRead(buttonPinM); //分ボタン
if (buttonState == LOW) {
setTime(hour(), minute() + 1, second(), day(), month(), year());
RTC.set(now());
}
buttonState = digitalRead(buttonPinS); //秒ボタン
if (buttonState == LOW) {
setTime(hour(), minute() , 0, day(), month(), year());
RTC.set(now());
}
tokei = now();
digitalTokei(); //LEDセット
}
void digitalTokei() {
String thisString1;
String thisString2;
int a;
a = second(); //秒
thisString1 = String(a).charAt(0); //秒1桁目を取り出し
thisString2 = String(a).charAt(1); //秒2桁目
if (thisString2 == "") {
thisString2 = thisString1;
thisString1 = "0";
}
tbset(5, thisString2); //秒2桁目をLEDにセット
tbset(4, thisString1); //秒1桁目
a = minute(); //分
thisString1 = String(a).charAt(0);
thisString2 = String(a).charAt(1);
if (thisString2 == "") {
thisString2 = thisString1;
thisString1 = "0";
}
tbset(3, thisString2);
tbset(2, thisString1);
a = hour(); //時
thisString1 = String(a).charAt(0);
thisString2 = String(a).charAt(1);
if (thisString2 == "") {
thisString2 = thisString1;
thisString1 = "0";
}
tbset(1, thisString2);
tbset(0, thisString1);
}
//テーブルの内容を見てLED表示
void dispTokei() {
for (int i = 0; i <= 3; i++)
{
for (int j = 0; j <= 5; j++)
{
digitalWrite( tb01[i], tb46[i][j]);
digitalWrite( tb02[j], tb46[i][j]);
// delay(1);
digitalWrite( tb01[i], LOW);
digitalWrite( tb02[j], LOW);
}
}
}
//10進数を 2進数に変換しLEDにセット
void tbset(int tb46yoko, String thisString) {
if (thisString == "0") {
tb46[0][tb46yoko] = LOW;
tb46[1][tb46yoko] = LOW;
tb46[2][tb46yoko] = LOW;
tb46[3][tb46yoko] = LOW;
}
if (thisString == "1") {
tb46[0][tb46yoko] = HIGH;
tb46[1][tb46yoko] = LOW;
tb46[2][tb46yoko] = LOW;
tb46[3][tb46yoko] = LOW;
}
if (thisString == "2") {
tb46[0][tb46yoko] = LOW;
tb46[1][tb46yoko] = HIGH;
tb46[2][tb46yoko] = LOW;
tb46[3][tb46yoko] = LOW;
}
if (thisString == "3") {
tb46[0][tb46yoko] = HIGH;
tb46[1][tb46yoko] = HIGH;
tb46[2][tb46yoko] = LOW;
tb46[3][tb46yoko] = LOW;
}
if (thisString == "4") {
tb46[0][tb46yoko] = LOW;
tb46[1][tb46yoko] = LOW;
tb46[2][tb46yoko] = HIGH;
tb46[3][tb46yoko] = LOW;
}
if (thisString == "5") {
tb46[0][tb46yoko] = HIGH;
tb46[1][tb46yoko] = LOW;
tb46[2][tb46yoko] = HIGH;
tb46[3][tb46yoko] = LOW;
}
if (thisString == "6") {
tb46[0][tb46yoko] = LOW;
tb46[1][tb46yoko] = HIGH;
tb46[2][tb46yoko] = HIGH;
tb46[3][tb46yoko] = LOW;
}
if (thisString == "7") {
tb46[0][tb46yoko] = HIGH;
tb46[1][tb46yoko] = HIGH;
tb46[2][tb46yoko] = HIGH;
tb46[3][tb46yoko] = LOW;
}
if (thisString == "8") {
tb46[0][tb46yoko] = LOW;
tb46[1][tb46yoko] = LOW;
tb46[2][tb46yoko] = LOW;
tb46[3][tb46yoko] = HIGH;
}
if (thisString == "9") {
tb46[0][tb46yoko] = HIGH;
tb46[1][tb46yoko] = LOW;
tb46[2][tb46yoko] = LOW;
tb46[3][tb46yoko] = HIGH;
}
}
ついでに外装も作り直しスイッチを上部に3個付け足しました。
それぞれ時を進める、分を進める、秒を0にする役割を持たせました。
Posted at 2018/02/25 10:31:46 | |
トラックバック(0) |
電子工作 | 趣味
 先日作成しました二進数時計ですが、実は1日で1分くらい遅れる時計でした。
 昨年から電子工作にハマっている私です。
 クローゼットの奥から出てきました「Kodak スナップキッズ」レンズ付きフィルム。


